upgrade could wipe out the boot blocks on the hard disk. On startup, you' ll get a cross over the hard disk icon with error code 84. You 'll still be able to boot from a floppy, and the hard disk will mount, but in order to boot from the hard drive again, you may have to remove it, and send it out for a low level format. Use with extreme caution!
Summary of the Diagnostics Routines
The Lisa's built-in diagnostic routines display various icons accompanied by error codes pointing to particular electronic components. In practice, electronic failures are seldom seen. The most common problems result from mechanical failures, especially with the disk drives. The next section tells how to deal with them.
Mechanical Problems with the 3.5 Inch Disk Drive
Just like its Macintosh counterpart, the Lisa's 400K 3.5-inch disk drive is subject to the following failures:
1. Eject mechanism makes eject noises but disks don't come out.
2. Eject mechanism fails to operate (doesn't make any eject noises at all) when rebooting after a System crash.
3. Grinding noises get louder and louder. Disks become unreadable.
The first failure indicates a lubrication problem. The second failure indicates the presence of an OEM 400K Mac drive. The third failure indicates a dirty stepper cam, a dirty head, and/or a clogged pressure pad. If disks don't read properly, try cleaning the heads.
The Sun 800K floppy is a little different. If your drive continually ejects, remove pins 9 and 20 from the drive cable. If your drive seems to be moving abnormally slow, check for an 800K ROM on the I/O board.
Drive Makes Eject Noises but Disks Fail to Eject
When the drive makes eject noises but the disks don't come out it usually means that the grease on the eject mechanism has solidified. To fix it, all you have to do is disassemble the eject mechanism and change the grease. Here's the complete procedure:
1. Disconnect the computer's power cord from the wall outlet.
2. Remove the disk drive cage as shown in Figures 1 to 3.
3. Disconnect all data and power cables from the installed drives.
4. Remove the internal disk drive by tilting the drive cage forward and loosening four Phillips-head screws at the bottom. Use a #1 Phillips-head screwdriver. Support the drive with one hand as shown in Figure 17.
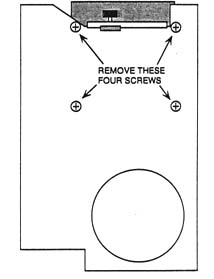
Figure 17 Lisa disk drive removal.